
Segments Beanie - Pattern Review
This pattern was released in August 2021 and was on a bunch of people’s to-do list in a matter of days. As of this writing, it is in 68 queues! I knew I had to put it on my needles with my Toasted Marshmallow colorway the very second I saw it.
If you are interested in working this pattern, read on to see how I fared through it.
Pattern Link: https://www.ravelry.com/patterns/library/segments-beanie
Pattern Author: Benjamin Matthews
Yarn Used: 1 skein - “Toasted Marshmallow” Worsted Weight by Mountaintop Yarn
Needles Used: US 6 and US 7 Circular Needles
Finished Item Weight/Yardage: 55 grams / Roughly 135 yards.
Time Spent: About 7 hours
I created a center pull ball by following this amazing tutorial on YouTube by Fiber Flux. She shows you how to use a tissue roll to create the perfect center pull ball. I created two using this method and it worked amazingly.


On initial cast on, the pattern doesn’t state what kind of cast on to use. Since this is a hat and will require a stretchy fit, I decided to go with German Twist Cast On (link to YouTube tutorial here).

The ribbing of the hat is pretty straightforward and worked up quickly, easily and beautifully. When I created the “Toasted Marshmallow” colorway I knew that it would work up into something beautiful, but I was not emotionally prepared for how beautiful it actually started coming out. It made me even more excited to finish the project. The best part is, this pattern claims to take only 125 yards of yarn so if I did my best to have a consistent gauge, I should be able to pull two hats out of this one skein. Let’s see where we stand when it is finished. Fingers crossed!

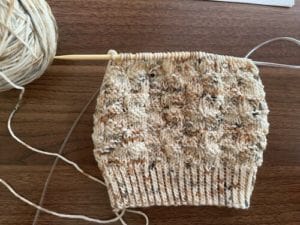
The repeat of the pattern is pretty easy to follow but I do suggest keeping the pattern handy so that you can review it as you go. I managed to work this whole section without making one single mistake. That has never happened before in my knitting life so it goes to show just how easy this pattern is to work.
I used the magic loop method to work this project and if I had to do it over again, I would choose to use the 16 inch recommended size instead because I feel like I could have worked this project much faster had I not used the magic loop method. So, if you are debating on whether to use some longer circular needles you already have or just purchasing the smaller circular needles, splurge on the smaller ones. The time you save will be well worth the money you spend.
Now it is time for the crown shaping. I’m nervous about this part but I am just going to jump right in.
The start of the crown shaping could have spelled out the word ‘purl’ instead of using just a ‘P’. At first glance, it’s a little confusing, but after a couple of nervous re-reads, I managed to gain my confidence in what I needed to do.
As nervous as I was about the crown shaping, that was the easiest part of the project. It was so satisfying because the more I did, the faster it went and I could see my project coming to an end.
The pattern suggests blocking the beanie, but I am happy with the shape it is now and won’t be blocking.

Final Thoughts:
I absolutely love the design of the pattern. The staggered triangles give a wonderful texture to the fabric of the beanie. This pattern would be striking with a solid color yarn or a gradient. If you were feeling really adventurous, you could even do the pattern in alternating colors with purl stitches being one color and knits being another. Now, that would be interesting. If you do that, comment the link to your finished project below because I would love to see it.
I absolutely loved working this pattern. It was well laid out and produced a beautiful beanie.
If you have any comments or want to add your thoughts on the pattern, comment below!